Then I taped a piece of acetate to a scrap of white matboard to serve as the "printing plate" for a session of experimenting with subtractive technique making several monotypes (or monoprints, which is what I believe they technically are called -- I'll delve more into that in another post later.)

This small print (Left) is the second one I pulled. The first one was too light. I decided it was not enough paint on the plate, so I really gobbed it on for this one. I think the thicker layer of paint is good up to a point. Too thick and it will "squish" under the press and all the linear marks and texture would be lost.
Print size is about 7 x 5 3/4 inches.
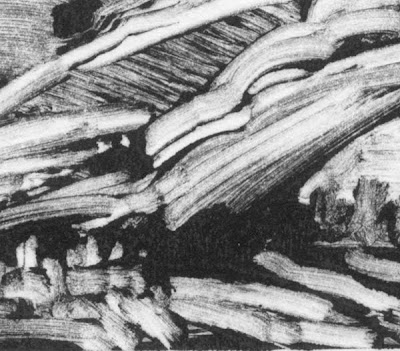
I used the cotton swabs in the dark passages. It didn't take much of a pass through the paint to completely filled a swab, so I used a lot more of them than I thought I would. In the detail photo (Below), you can see the cotton swab strokes cutting across the brushstrokes. I like the way that looks; it reminds me of some passages in the monotypes done by William Blake (1757-1827).
I was trying to get a sense of a storm cloud bearing down on the land, maybe even crushing (Detail above). I got some surprises with the cotton swabs--those that were "frayed" left more interesting "starting" and "stopping" marks.

This next print (Above) scanned as if it were brownish -- which it should be, as I used burnt umber. Print size is about 4 x 8 inches.
This print (detail at Right) was the result of partially cleaning the plate with mineral spirits and then deciding I liked what remained after the first wipe of the rag. So I went from there and invented something of a prairie landscape with patches of snow in it, some sagebrush and distant mountains or hills. I used both ends of the brush (bristle and handle tip) along with cotton swabs. The texture of the paper is very evident in this print. I need to think about how to take advantage of the paper texture.
This print (Left) started with a REALLY thick, tacky layer of paint on the plate. I didn't think it would work very well, and the only reason it worked at all was because I was aggressive with the used of the rag. I think I wasted a bit of paint on this one.
I should mention here that the clean edges around the first two prints are the result of taping off the image area before rolling out the paint and creating the image. The tape has to be peeled off before running the plate under the press and it was sorta messy, so I decided not to continue taping the plate off for each print.
I like the random edge made by the brayer better than the clean edge left by the tape.
The detail (Right) shows the amount of detail I was able to achieve on such a small format using just the swabs and rag.
Print size is about 5 1/2 by 7 1/2 inches.
This next print is even smaller than the others. It is about 3 1/2 by 3 1/2 inches. The ridge appearance was left not by a brush but by the rag. It must have been the way I held it, because I went through another several prints trying to duplicated that and it didn't quite repeat in this way. I think it has an appearance that is almost like wood grain. I used the handle of the brush to make some of the contour lines.

The detail (Right) shows areas where the paint itself is suggestive of form with no real "help" from me. I like that!
And what's a studio without a fruit still-life? So here's mine for the day -- an invented pear.
I like this print. I like everything about it. I suppose when I look at it again tomorrow, I'll find all kinds of things in it that I don't like. But for now it's of interest. I especially like the irregular border edge of the image. It makes the taped-off "perfect" edge seem boring. I tried a little yellow ochre in this print. I wasn't happy with how that color printed; it's too dull compared to the result I'd envisioned. Next time I'll try a cadmium yellow or even a lemon yellow.
Print size is about 9 x 6 inches.
The detail (Above) shows what I achieved with the stem. I was really surprised by the printed image versus what I saw on the plate.
This detail (Right) shows the upper left corner of the pear print. I was very excited to see how the layers of paint retained their own individual characteristics, texture and shape. I must have the press pressure about right for the amount of paint I was rolling onto the plate by the time I got to this particular print. Hmm. I see that the thinnest (most transparent) layer of paint is what the scanner saw as brownish and the progressively thicker (more opaque) layers it saw as somewhat blackish.
This (Below) is the last print of the session. I don't think it is necessarily the best of the session. Just the last. By this time I was becoming more comfortable with the speed at which I needed to be creating the images so that the paint would be fluid enough to transfer with the printing press.
I applied a thicker layer of paint onto the plate for this image and then tried to realize the image as quickly as possible. The result was more of a dark/light contrast rather than any real subtle shifts from dark to light or vice versa. I'm not sure I like the resulting print quality of this manner as well as the earlier ones. Print size is about 8 1/2 by 5 1/2 inches.
The detail (Right) shows strong decisive directional strokes or passes with brush and rag. I didn't use the cotton swabs on this print.
Another detail (Right.) I really tried to build form with just two or three values. Actually, only two values; the middle tones are the result of paint film left behind by the rag. If I wiped out too much, I simply added more paint with the brush.
All in all, the printing session was productive, not only in numbers of monotypes printed, but also in what I discovered in the process.


No comments:
Post a Comment