Looks like I will be able to re-direct my attention to making art. Since taking a full-time K-12 Art Teacher position in 2015 and then, after four years, I returned to my hometown just in time for the start of COVID. As that wound down a bit, I took up substitute teaching. Good in many ways but through most of the year it also took a noticeable bite out of my studio time for making art. That said, I'm about to finish a long-term substitute position (the second one this school year.) So . . . . this summer is going to be interesting and will probably pass far too quickly but not without some productive time once again (finally) in the studio.
Tuesday, March 19, 2024
Thursday, December 26, 2019
Getting the studio back into shape
It's been four years since I was active in my studio. A lot of different things happened in that interim -- some things difficult to deal with but all was survived (or at least muddled through). The Dec. 17 and 27, 2019 blog posts here show what I've done in the past couple weeks in paper mache while also cleaning/organizing the studio to make suitable space in which to once more create paintings. The paper mache process tends to be somewhat "auto pilot" and that suits my frame of mind at the moment. It allows me to think while my hands are busy. It also means frequent breaks to spend organizing the studio. There's still a lot to do but it's progressing.
A side project in paper mache - Cat!
Of the vessels (or vases, if one wants to use that term instead), which I started making and posted images here on December 17, there are now nine total. Six have nine coats of paper mache applied and three have four coats of paper mache. Layering on all those similar objects was a bit tedious so Christmas day was a nice break away.
Today back to the studio and I decided to work on a funky paper mache cat that I had done as a demo for an art class in Heart Butte. Here it is at the stage it is now in. The photos seem to show it in a different hue tone but that was just how the lighting was striking the surface relative to where I stood with the camera. I like the warmer hue (sort of a yellowy or old newspaper hue.)
I might just finish the mottled application of newsprint paper mache on the few remaining areas that need it and call it done as I rather like how it's looking. I think I'll title it "Daily Mews."


Tuesday, December 17, 2019
Well, it's about time! (or Long time no post!)
So, long time no post! I spent the last four years teaching art full-time at Heart Butte School, which is in the small community of Heart Butte on the Blackfeet Nation Reservation in Montana. I'll do some "catch-up" posts about that experience later but right now I want to post some photos of my current project in the studio. I should be specific by stating "current art project" as there is also the "project" of cleaning and organizing the studio after such an extended hiatus.
I started with clearing out all the things that had accumulated in my studio but had nothing to do with my studio work. Things like all the stuff that didn't sell in my Mom's garage sale when she moved out of her house. Then there was all the stuff that got deposited in my space because someone thought I might/could use it. Newspapers and cardboard were the biggies; I stashed all that in the back room until I would have a chance to make a trip to the local recycle business.
All the sorting, giving away, tossing got pretty monotonous after weeks of it. I came across a paper scrap across which, years ago, I had scribbled the following quote: "Accept the place and time that you're found in and begin where you are." A little light bulb came on. I decided to take a break from the sorting, cleaning, etc. and start making some art even if there was "standing room only" in the studio at the moment. Looking around the crowded space, I decided to get two birds with one stone. I added a caveat to the art making: I would have to use materials already on-hand until said materials were used up.
So I started with tempera paint and paper. I made oodles of monoprints and transfer prints. Then it struck me that the tempera paint wasn't really taking up much space so when it might be all gone, I wasn't going to gain very much square footage back. That in mind, I consolidated all the water-based wall paints I had left over from mural jobs. Thirty-two one-gallon cans were replaced by two five-gallon buckets that stacked. Lots of floor space gained!
Next I eyed the newspaper mountain and stacks of cardboard and cardboard boxes. And that led to the art project I am currently working on. Vessels. Paper Mache vessels. Here are photos showing the in-progress stages so far. There will be four sets of three vessels each (total of 12 vessels.)
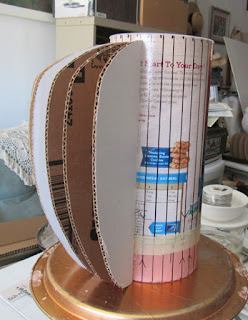
This first photo shows the start of a vessel. I determine what I want the completed vessel/vase profile to look like (factoring in the cylinder -- in this case I'm using empty cardboard oatmeal canisters.) I made this particular profile two inches taller than the cardboard canister by cutting two inches from another canister and attaching it to another canister. That gave me my middle-size vessel.
The canister I took the cut-off from was then attached to another canister for the large-size vessel. For the small vessel I simply used an unmodified canister. Using a template I made, I cut cardboard ribs (30 total for each vase) and hot glued them in place around the canister.


I started with clearing out all the things that had accumulated in my studio but had nothing to do with my studio work. Things like all the stuff that didn't sell in my Mom's garage sale when she moved out of her house. Then there was all the stuff that got deposited in my space because someone thought I might/could use it. Newspapers and cardboard were the biggies; I stashed all that in the back room until I would have a chance to make a trip to the local recycle business.
All the sorting, giving away, tossing got pretty monotonous after weeks of it. I came across a paper scrap across which, years ago, I had scribbled the following quote: "Accept the place and time that you're found in and begin where you are." A little light bulb came on. I decided to take a break from the sorting, cleaning, etc. and start making some art even if there was "standing room only" in the studio at the moment. Looking around the crowded space, I decided to get two birds with one stone. I added a caveat to the art making: I would have to use materials already on-hand until said materials were used up.
So I started with tempera paint and paper. I made oodles of monoprints and transfer prints. Then it struck me that the tempera paint wasn't really taking up much space so when it might be all gone, I wasn't going to gain very much square footage back. That in mind, I consolidated all the water-based wall paints I had left over from mural jobs. Thirty-two one-gallon cans were replaced by two five-gallon buckets that stacked. Lots of floor space gained!
Next I eyed the newspaper mountain and stacks of cardboard and cardboard boxes. And that led to the art project I am currently working on. Vessels. Paper Mache vessels. Here are photos showing the in-progress stages so far. There will be four sets of three vessels each (total of 12 vessels.)
This first photo shows the start of a vessel. I determine what I want the completed vessel/vase profile to look like (factoring in the cylinder -- in this case I'm using empty cardboard oatmeal canisters.) I made this particular profile two inches taller than the cardboard canister by cutting two inches from another canister and attaching it to another canister. That gave me my middle-size vessel.
The canister I took the cut-off from was then attached to another canister for the large-size vessel. For the small vessel I simply used an unmodified canister. Using a template I made, I cut cardboard ribs (30 total for each vase) and hot glued them in place around the canister.

The second photo (below) shows one of the large vases with all the ribs in place and ready for covering with masking tape. I was tempted to leave one of the vases at this stage, as I find it a beautiful form to look at and enjoy how light plays across it.

In this next photo I have placed all three vase sizes together. The small vase is to the left of the large one (center) and already has several layers of paper mache on it.

Here is a photo (below) of one of the large vases with the masking tape, ready to put the first layer of paper mache on it.

Photo (below) shows the small vase with just a couple layers of paper mache on it. The cardboard ribs are still visible through the paper mache. It's a nice effect that will not disappear until I apply the final layer of paper mache.

Sunday, February 3, 2013
"Wilson's Bed of Roses" - a painting in-progress
Again, it has been a while since I last posted here. I've been posting more on my Facebook business page but I've wondered if I should be posting parallel entries here. I also have a regular website that I'm updating, and I'm going into my third year with a shop on Etsy. For now, anyone wanting to see my most recent painting activity might want to check out my Facebook business page at facebook.com/PoppengaArtStudio
Things have been super busy in the studio with several oil paintings approaching finish. And when I'm not in the studio or researching/writing proposals for public art projects, I'm teaching art once a month at each of several rural schools here in central Montana.
Here is the latest work in-progress (Saturday evening's studio session.) I've titled it "Wilson's Rose Bed" for the cat who inspired this. Wilson is an older cat who is missing his left front leg -- making him a special needs feline when it comes to adoption.
The painting is not yet finished (no whiskers and a few other details yet to come) but is at a stage that I'd like to share. First photo is the entire work thus far (it is oil on stretched canvas, 16 x 18 inches.) The four photos after are details. Click on photos to see larger version. Enjoy!

(Above) The fabric Wilson is sitting on (and the rose he "holds") is invented at the easel. I feel like this could be a bed with the blankets turned down and this is a flower print sheet - his "rose bed."


Eyes are my favorite part of any portrait (animals and people too) and Wilson's eyes are compelling enough to make you almost not notice that I've yet to add his whiskers.

Things have been super busy in the studio with several oil paintings approaching finish. And when I'm not in the studio or researching/writing proposals for public art projects, I'm teaching art once a month at each of several rural schools here in central Montana.
Here is the latest work in-progress (Saturday evening's studio session.) I've titled it "Wilson's Rose Bed" for the cat who inspired this. Wilson is an older cat who is missing his left front leg -- making him a special needs feline when it comes to adoption.
The painting is not yet finished (no whiskers and a few other details yet to come) but is at a stage that I'd like to share. First photo is the entire work thus far (it is oil on stretched canvas, 16 x 18 inches.) The four photos after are details. Click on photos to see larger version. Enjoy!

(Above) The fabric Wilson is sitting on (and the rose he "holds") is invented at the easel. I feel like this could be a bed with the blankets turned down and this is a flower print sheet - his "rose bed."

(Above & Below) I built up multiple layers of paint over several weeks (months, really, since I usually have several works in-progress at any given time, so the rotation through can take weeks) The effect approaches capturing atmosphere/light and is especially evident around Wilson's ears.

(Below) I enjoy making details in a work by pulling on my memory of various objects, in this case a simple single rose.

Eyes are my favorite part of any portrait (animals and people too) and Wilson's eyes are compelling enough to make you almost not notice that I've yet to add his whiskers.

My last post, immediately prior to this one, was in January. To access it, click 2013/January in the Blog Archive in the right column on this page to view Clark Kent Super Kitty or click this word: Clark
Thursday, January 10, 2013
Clark Kent - Super Kitty
It's been a while since my last post here -- which means I've been busy in the studio. One of my special projects is the subject of this post: A handsome orange tabby named Clark Kent. He is a rescued cat from the streets of Philadelphia, where he'd been tossed and left to die in a miserable and painful state. Nursed back to as good a health as possible, he now lives in a loving home where he'll be well cared for by his human "mom." I read about him on Modern Cat Magazine's online Cover Cat Contest (and have been voting for him as much as possible.) From the information/comments on Modern Cat, I read the articles about his rescue and then also discovered he has a Facebook page too! I'll put links at the end of this post for those who want to know more about Clark Kent (nicknamed Clark.)
Clark's story reminded me of an incident I experienced as a small child, visiting Philadelphia with my parents. Sitting in the car, waiting for my parents to return and watching the pouring rain. I spotted a very wet and distressed orange tabby near the curb. It was all balled up on itself, the way cats do when they are trying very hard to not get wet and have no shelter to go to. As I watched, a youth and two adults passed by and the youth kicked the cat. The adults were either oblivious or didn't care, and the three continued on until they were out of sight. For days I found myself thinking about that orange cat and how I would have let it snuggle on my warm bed and each time my eyes welled up with tears but I couldn't tell my parents why--or maybe they simply didn't understand. Well, that was a long time ago, but it seemed not so distant when I looked at the photos of Clark and read his story, another orange tabby in Philadelphia.
I decided to paint a portrait of Clark. It's oil on birch panel, 19 1/2 inches high by 21 1/2 inches wide. I haven't titled it yet, though I rather like something along the lines of "Urban Cat and Mouse." I worked towards achieving a "folk art" feel about it because it seems to connect better to the childhood incident I mentioned in the previous paragraph; something not so polished but more sincere and true to the basic feelings involved.
As soon as this painting is dry enough to ship safely, it will find it's home with Clark. I hope Clark approves.
Click on the photos below to see a larger version of each.

Below: Close-up -- I enjoy painting eyes and especially cat eyes. In this close-up you can see the sketchy quality of line I used to define the darker reddish tones in the fur.

Below: The mouse. One of the photos of Clark on his Facebook page shows him playing with a toy mouse (or at least that's what it looks like -- sometimes it's hard to tell what some cat toys are "suppose" to be.)

Below: Another detail section showing the sketchy quality of brush strokes in a linear way to suggest the type of fur Clark has.

Here are the links to Clark's information at Modern Cat cover cat contest and the article about his Rescue and his Facebook page
Friday, December 14, 2012
Bike Racks, Bench for Lewiston, Idaho
Well, it has been way too long between posts here on the blog! I've been trying to establish a business presence on Etsy and also on Facebook. Visitor numbers and sales will tell if all the time and effort has been worth it or not, but it's still too soon to say.
Meanwhile, I've been busy with several other studio projects, including a bicycle racks and bench project for the City of Lewiston, Idaho. Below are photos of the two finished bicycle racks. It was nice to have a client who was willing to have the racks coated in colors other than black.
While the design concepts are mine, fabrication was accomplished by Warden Bourne of Lewistown, MT (EastMont Productions). Besides being a fine welder, Warden also provides input and modifications to the designs during the fabrication process, improving on the functionality of the final product. The finish coating on the "Huge&Kisses" rack and the bench (shown here before receiving its finish coat) is by Shane Ruckman (of Lewistown.) The powder-coat finish on the "Waving Wheat" rack is by HCR Inc. (also of Lewistown.)
This cherry red bike rack is titled "Hugs & Kisses" and offers several configurations for bicycles to be locked securely while providing support for the frame of the bicycle. Fabricated in half-inch steel, it's finished with a tough industrial polyurethane coating that's lightly textured, feels good to the touch and will not mar the surfaces of parked bicycles. It parks two to four bikes.

This "Waving Wheat" bicycle rack is designed to park two bikes, but bikes can be paired two to a side, for a total of four. Like the "Hugs&Kisses" rack, it provides several configurations for securing parked bicycles. Fabricated of steel and powder-coated in a golden yellow hue.

The bench is shown here prior to receiving its finish coating of industrial polyurethane. The utility lids will be masked off during the finish coating application. Utility lids are often quite beautiful in their design and the unique patina they develop over time from weather and vehicles driving over them daily. These lids are from the City of Lewistown, Idaho and are now permanently part of this bench. I should note that prior to this bench, I had no idea how heavy utility lids are. With the slab of this bench being half-inch steel and the insets of cast iron lids that weigh up to three times the weight of the circle of steel that was cut out to accommodate the lids, it's safe to say that this bench won't be blown away or be carried off.

Here's another view that, in the low early evening light of the fabrication shop. I really like the way the wavy edge catches the light and casts a gently rolling shadow beneath.

Meanwhile, I've been busy with several other studio projects, including a bicycle racks and bench project for the City of Lewiston, Idaho. Below are photos of the two finished bicycle racks. It was nice to have a client who was willing to have the racks coated in colors other than black.
While the design concepts are mine, fabrication was accomplished by Warden Bourne of Lewistown, MT (EastMont Productions). Besides being a fine welder, Warden also provides input and modifications to the designs during the fabrication process, improving on the functionality of the final product. The finish coating on the "Huge&Kisses" rack and the bench (shown here before receiving its finish coat) is by Shane Ruckman (of Lewistown.) The powder-coat finish on the "Waving Wheat" rack is by HCR Inc. (also of Lewistown.)
This cherry red bike rack is titled "Hugs & Kisses" and offers several configurations for bicycles to be locked securely while providing support for the frame of the bicycle. Fabricated in half-inch steel, it's finished with a tough industrial polyurethane coating that's lightly textured, feels good to the touch and will not mar the surfaces of parked bicycles. It parks two to four bikes.

This "Waving Wheat" bicycle rack is designed to park two bikes, but bikes can be paired two to a side, for a total of four. Like the "Hugs&Kisses" rack, it provides several configurations for securing parked bicycles. Fabricated of steel and powder-coated in a golden yellow hue.


Here's another view that, in the low early evening light of the fabrication shop. I really like the way the wavy edge catches the light and casts a gently rolling shadow beneath.

Sunday, March 4, 2012
The Owl & The Pussycat
Hard to believe that it has been over a month since I last posted an entry here. I've been way too busy with the work I do as a visiting artist in the rural schools here in central Montana. I also had several things to do at the studio, including trying to re-create some work that was damaged beyond repair by the studio cat. I resisted "damaging" the cat and tossing her outside. What she did and the resulting mess is best described as the "cat attack" and any further explanation is another post, which will have to wait until sometime after I'm through being angry over it.
But on a happier note, the cat-created mess led me to rearrange, reorganize my studio space and that has proved to be a good thing. To keep this post on the upbeat, I'm including an oil sketch for a painting that will take form sometime after I recreate the ones destroyed by the cat attack. This is a fun take on the Edward Lear poem "The Owl and The Pussycat" blended with Grant Wood's famous painting "American Gothic." I'd title my work "The Own and The Pussycat at Home on the Farm" or something to that effect. This oil sketch is about 8 x 11 inches


But on a happier note, the cat-created mess led me to rearrange, reorganize my studio space and that has proved to be a good thing. To keep this post on the upbeat, I'm including an oil sketch for a painting that will take form sometime after I recreate the ones destroyed by the cat attack. This is a fun take on the Edward Lear poem "The Owl and The Pussycat" blended with Grant Wood's famous painting "American Gothic." I'd title my work "The Own and The Pussycat at Home on the Farm" or something to that effect. This oil sketch is about 8 x 11 inches


Saturday, January 28, 2012
So, how much snow?

Some years are big on snow. Some are not. And 1909 was pretty big. Here's an interesting photo I came across that shows a steam locomotive "stuck real good" in the winter of 1909. It is located somewhere along the run between Lewistown and Buffalo-Judith Gap area (immediately west of Lewistown.) In 1994, when I was the Home & Family Editor of the Lewistown News Argus, I interviewed Red Hanley. Red had worked as an engineer and he told me an interesting story about how he got a steam locomotive stuck in snow along the same run as in the photo. But, unlike this train, Red's was pushing a weighted boxcar with a plow in front instead of just a plow. As I recall, he told me he'd been advised to "give it as much speed as possible" --- he did and the train went pow! right into the snow drift---in, in, in, in, ...in...........in.............in............in.......and then it stopped. It was buried at least as deep as the one in this photo, or maybe more.
Monday, January 23, 2012
Aaaah! The drive home after a day's work. . .

This is the last ten miles before Lewistown (photo above.) Actually, less than ten at this point. It is one of my favorite "road views" The Big Snowies are on the horizon, the road is bare and dry. The usual amount of "quitin' time" traffic and a freshly brewed (in the car) cup of ginger/lemon tea on the console.
Another photo (below) of today's drive home, taken just at the top of the Arrow Creek Canyon (with, at that point, more than half the drive remaining.) I almost always stop at this field entrance to take photos of the Highwood Mountains and Square Butte, but today I turned the camera to the southwest and captured the late afternoon winter sun and the Big Belt Mountains on the horizon.

Over most of the climb up Arrow Creek Canyon, I got to share the road with some big boys coming down (photo below.) Perhaps a half dozen of these rigs and their multiple advance and rear guard vehicles passed me. I didn't get a very good look at what they were hauling except that all carried an identical load. Perhaps it is something headed for the Canada oil fields.

 And today's drive was not entirely all peaceful and idylic. On the morning leg, a large cock ringneck pheasant made a bad decision and the jeep's passenger side mirror caught the bird. It sounded like something far larger than the bird hit. Had I not seen the pheasant, I would have thought a deer had run into the side of the vehicle. What a loud bang! I was doing 65 mpg. The mirror is designed to "give" and that's exactly what it did (which is cool for this is a 1996 jeep.) The mirror and its housing and manual cable controls were undamaged. Only one little piece on the part mounted to the door actually broke. With that and some assembly, it will be as good as "new" (which is to say, as new as a nearly 20 year old vehicle can be.)
 Thursday, January 12, 2012
Long Thin Road

Mr. Lightfoot (Gordon ta dem dat know's 'im) may sing about the "Long Thin Dawn" but here's one for a long thin road. This windshield view is heading east to Lewistown. I'd spent the day, first at Surprise Creek Hutterite Colony and then at Geyser School, teaching art. This photo (above) was taken on the fly somewhere just east of Stanford (No, I don't know what mile marker it was---gotta keep my eye on the road, ya know!) I've long liked this stretch of blacktop. It's one of the few places to have two lanes in the uphill (west-bound) lane. See all the traffic? And it's rush hour too!
This next photo was taken just a little bit farther down the road but before Moccasin. I had to stop and get out for this one. (click on any of the photos for a larger view.) I like the way sunset turns snow to pink on the east horzon. The mountains in this photo are the Big Snowies.

And for the grand finale, one last view of the setting sun. I'm not skilled at sideview mirror photography, so this was a stop too.) This is looking west, as the sun sets behind the Belt Mountains.

Hope you enjoy the views! The land and skyscapes are what keep the drive fresh every time, no matter how many times I've traveled the route before---it is always "new again."
Friday, January 6, 2012
War Horse Reservoir
It has been so warm the past several days (60 degrees F yesterday) that a drive was in order today. Bright blue skies and warm sunshine in January -- how could it be any better?
The end destination for the drive was a reservoir named War Horse northeast of the town of Grass Range. Grass Range is 30 miles east of Lewistown, so War Horse Reservoir is about 45 to 50 miles from where I live. Once you leave the black top just east of Grass Range a very good gravel road takes you north as it arcs slowly back to the west while also heading north. A rougher (but very passable) two-track road takes off into the wind beaten ponderosa pines and eventually leads to the south shore of the reservoir. The clusters of pines are a shale forest and in places on the forest floor a fine shale "soil" is visible. It is an area of critical environmental concern by the Bureau of Land Management (BLM) because of the unique plant community.
The photo below is taken from the road on the south shore looking west. The edge of the reservoir is visible to the far right. The Judith Mountains, with Black Butte on the far right of the string are on the horizon.
(click photos to view larger)


Driving down the road shown in the previous photo, the creek that feeds the reservoir crosses. I was surprised at its size for this time of year, but considering how large War Horse Reservoir is, this creek must carry a lot of water year round.

The following photo is prairie, prairie, prairie -- with the Judith Mountains in the distance to the west.

The next photo is a view farther down the road from the previous photo but looking south. In the distance are the Big Snowy Mountains (also referred to locally as the Big Snowies or, simply, the Snowies) The dished in middle of the Snowies' skyline is Half Moon Canyon.

Hope you enjoyed the photos! Your questions or comments are welcome and I will try to respond to questions within a day or two.
The end destination for the drive was a reservoir named War Horse northeast of the town of Grass Range. Grass Range is 30 miles east of Lewistown, so War Horse Reservoir is about 45 to 50 miles from where I live. Once you leave the black top just east of Grass Range a very good gravel road takes you north as it arcs slowly back to the west while also heading north. A rougher (but very passable) two-track road takes off into the wind beaten ponderosa pines and eventually leads to the south shore of the reservoir. The clusters of pines are a shale forest and in places on the forest floor a fine shale "soil" is visible. It is an area of critical environmental concern by the Bureau of Land Management (BLM) because of the unique plant community.
The photo below is taken from the road on the south shore looking west. The edge of the reservoir is visible to the far right. The Judith Mountains, with Black Butte on the far right of the string are on the horizon.
(click photos to view larger)

This next photo shows the good gravel road at the point where the two-track takes off (that would be to the right of where I stood to shoot this photo.) I love how roads can seem to have no end in the vastness of the central Montana prairie.

Driving down the road shown in the previous photo, the creek that feeds the reservoir crosses. I was surprised at its size for this time of year, but considering how large War Horse Reservoir is, this creek must carry a lot of water year round.

The following photo is prairie, prairie, prairie -- with the Judith Mountains in the distance to the west.

The next photo is a view farther down the road from the previous photo but looking south. In the distance are the Big Snowy Mountains (also referred to locally as the Big Snowies or, simply, the Snowies) The dished in middle of the Snowies' skyline is Half Moon Canyon.

Hope you enjoyed the photos! Your questions or comments are welcome and I will try to respond to questions within a day or two.
Subscribe to:
Posts (Atom)