Thursday, December 26, 2019
Getting the studio back into shape
It's been four years since I was active in my studio. A lot of different things happened in that interim -- some things difficult to deal with but all was survived (or at least muddled through). The Dec. 17 and 27, 2019 blog posts here show what I've done in the past couple weeks in paper mache while also cleaning/organizing the studio to make suitable space in which to once more create paintings. The paper mache process tends to be somewhat "auto pilot" and that suits my frame of mind at the moment. It allows me to think while my hands are busy. It also means frequent breaks to spend organizing the studio. There's still a lot to do but it's progressing.
A side project in paper mache - Cat!
Of the vessels (or vases, if one wants to use that term instead), which I started making and posted images here on December 17, there are now nine total. Six have nine coats of paper mache applied and three have four coats of paper mache. Layering on all those similar objects was a bit tedious so Christmas day was a nice break away.
Today back to the studio and I decided to work on a funky paper mache cat that I had done as a demo for an art class in Heart Butte. Here it is at the stage it is now in. The photos seem to show it in a different hue tone but that was just how the lighting was striking the surface relative to where I stood with the camera. I like the warmer hue (sort of a yellowy or old newspaper hue.)
I might just finish the mottled application of newsprint paper mache on the few remaining areas that need it and call it done as I rather like how it's looking. I think I'll title it "Daily Mews."


Tuesday, December 17, 2019
Well, it's about time! (or Long time no post!)
So, long time no post! I spent the last four years teaching art full-time at Heart Butte School, which is in the small community of Heart Butte on the Blackfeet Nation Reservation in Montana. I'll do some "catch-up" posts about that experience later but right now I want to post some photos of my current project in the studio. I should be specific by stating "current art project" as there is also the "project" of cleaning and organizing the studio after such an extended hiatus.
I started with clearing out all the things that had accumulated in my studio but had nothing to do with my studio work. Things like all the stuff that didn't sell in my Mom's garage sale when she moved out of her house. Then there was all the stuff that got deposited in my space because someone thought I might/could use it. Newspapers and cardboard were the biggies; I stashed all that in the back room until I would have a chance to make a trip to the local recycle business.
All the sorting, giving away, tossing got pretty monotonous after weeks of it. I came across a paper scrap across which, years ago, I had scribbled the following quote: "Accept the place and time that you're found in and begin where you are." A little light bulb came on. I decided to take a break from the sorting, cleaning, etc. and start making some art even if there was "standing room only" in the studio at the moment. Looking around the crowded space, I decided to get two birds with one stone. I added a caveat to the art making: I would have to use materials already on-hand until said materials were used up.
So I started with tempera paint and paper. I made oodles of monoprints and transfer prints. Then it struck me that the tempera paint wasn't really taking up much space so when it might be all gone, I wasn't going to gain very much square footage back. That in mind, I consolidated all the water-based wall paints I had left over from mural jobs. Thirty-two one-gallon cans were replaced by two five-gallon buckets that stacked. Lots of floor space gained!
Next I eyed the newspaper mountain and stacks of cardboard and cardboard boxes. And that led to the art project I am currently working on. Vessels. Paper Mache vessels. Here are photos showing the in-progress stages so far. There will be four sets of three vessels each (total of 12 vessels.)
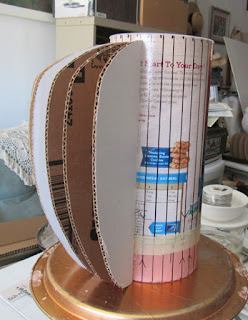
This first photo shows the start of a vessel. I determine what I want the completed vessel/vase profile to look like (factoring in the cylinder -- in this case I'm using empty cardboard oatmeal canisters.) I made this particular profile two inches taller than the cardboard canister by cutting two inches from another canister and attaching it to another canister. That gave me my middle-size vessel.
The canister I took the cut-off from was then attached to another canister for the large-size vessel. For the small vessel I simply used an unmodified canister. Using a template I made, I cut cardboard ribs (30 total for each vase) and hot glued them in place around the canister.


I started with clearing out all the things that had accumulated in my studio but had nothing to do with my studio work. Things like all the stuff that didn't sell in my Mom's garage sale when she moved out of her house. Then there was all the stuff that got deposited in my space because someone thought I might/could use it. Newspapers and cardboard were the biggies; I stashed all that in the back room until I would have a chance to make a trip to the local recycle business.
All the sorting, giving away, tossing got pretty monotonous after weeks of it. I came across a paper scrap across which, years ago, I had scribbled the following quote: "Accept the place and time that you're found in and begin where you are." A little light bulb came on. I decided to take a break from the sorting, cleaning, etc. and start making some art even if there was "standing room only" in the studio at the moment. Looking around the crowded space, I decided to get two birds with one stone. I added a caveat to the art making: I would have to use materials already on-hand until said materials were used up.
So I started with tempera paint and paper. I made oodles of monoprints and transfer prints. Then it struck me that the tempera paint wasn't really taking up much space so when it might be all gone, I wasn't going to gain very much square footage back. That in mind, I consolidated all the water-based wall paints I had left over from mural jobs. Thirty-two one-gallon cans were replaced by two five-gallon buckets that stacked. Lots of floor space gained!
Next I eyed the newspaper mountain and stacks of cardboard and cardboard boxes. And that led to the art project I am currently working on. Vessels. Paper Mache vessels. Here are photos showing the in-progress stages so far. There will be four sets of three vessels each (total of 12 vessels.)
This first photo shows the start of a vessel. I determine what I want the completed vessel/vase profile to look like (factoring in the cylinder -- in this case I'm using empty cardboard oatmeal canisters.) I made this particular profile two inches taller than the cardboard canister by cutting two inches from another canister and attaching it to another canister. That gave me my middle-size vessel.
The canister I took the cut-off from was then attached to another canister for the large-size vessel. For the small vessel I simply used an unmodified canister. Using a template I made, I cut cardboard ribs (30 total for each vase) and hot glued them in place around the canister.

The second photo (below) shows one of the large vases with all the ribs in place and ready for covering with masking tape. I was tempted to leave one of the vases at this stage, as I find it a beautiful form to look at and enjoy how light plays across it.

In this next photo I have placed all three vase sizes together. The small vase is to the left of the large one (center) and already has several layers of paper mache on it.

Here is a photo (below) of one of the large vases with the masking tape, ready to put the first layer of paper mache on it.

Photo (below) shows the small vase with just a couple layers of paper mache on it. The cardboard ribs are still visible through the paper mache. It's a nice effect that will not disappear until I apply the final layer of paper mache.

Subscribe to:
Posts (Atom)