I pulled Colors 12 and 13 today. I'm thinking one more color on the far side of the river, possibly two more. Then the Bighorn Sheep will be started (probably five or six colors on each one.) It's been cold outside; Minus 8 degrees when I left the studio at midnight. It did stop snowing (finally) but the night sky was clear, so with no cloud cover the temperature will drop even more before daybreak. I keep the studio at about 50 or 55 degrees - perfect for working and the screen inks flow just right.
(Above) Color 12 is a slightly peachy tone that covers the far side of the river and the distant landforms. My lighting was slightly different when I photographed tonight so the colors as they appear in the photo are a bit closer to the actual colors than most all of the previous progression photos posted.
(Below) Color 13 starts to show some definition in the far side of the river and the distant landforms.
Sunday, November 21, 2010
Tuesday, November 16, 2010
Serigraph (silkscreen) Commission in progress
Here are updates for colors number 10 and number 11. I'm happy with the way the rocks are coming out. One more color to represent the surfaces of rock that are sunlit and then the distant landscape and the mountain sheep will be tackled next. This has been a little slower-going than I'd hoped as I'm having to fit this project into a full schedule with other projects in progress as well.
(Above) The serigraph at the 10 Color stage.
(Below) The serigraph at the 11 Color stage. Just one more color for the foreground and middle ground rocks and then on to the background landscape! Nice to finally see the foreground ram starting to take shape, even if it is only because the color field around him is what is being printed.
(Above) The serigraph at the 10 Color stage.
Sunday, November 7, 2010
Serigraph (silkscreen) Commission in progress
Here's today's update! Only got one color done today but am pleased as now the shapes are starting to become apparent. If I think of it tomorrow, I'll photograph my line drawing that is the basis for this serigraph.
Two things I forgot to mention in my previous post: The image area is 30 inch by 19 inch and the commission is for the Friends Of Missouri Breaks Monument (the Missouri Breaks Monument is a wild/scenic area along the Missouri River north and east of Lewistown, Montana.)
Also, this serigraph is being done in solvent-based inks (Naz-Dar 5500 Series) and a mucilage block-out.
Saturday, November 6, 2010
Serigraph (silkscreen) Commission in progress
Before I write/say anything, I should note that the colors as seen in these progress photos are not completely true to the actual colors on the serigraphs. I'm photographing these on the layout table and so lighting is not the best and there is also some distortion as I can't get the camera quite far enough away.
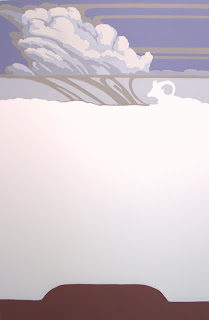
In the photo at the right, you are seeing the upper third of the image area -- at this stage the rest of the image area is still just the white paper. In this photo there are two colors: The purplish sky (pulled first) and the lighter bluish tone beneath where the thunderhead will be. Where these first two colors overlap it has the effect of creating a third color. I masked out the remainder of the image area, including the far ram (seen here as white.)

Photo at the above is at the five color stage. The thunderhead is starting to take on a nice decorative shape.
Photo above is at the six color stage. At this point I decided to stop working on the sky portion of the image and tackle the main body of the serigraph, and especially the lettering that would appear at the bottom of the image.
Photo above shows the 7th color now added at the bottom of the image. Again, I should note that colors are not entirely true in these photos (for example, the blank area is actually pure white of the paper still.)--and also there is some distortion due to having to photograph at too close a distance. The brown area (actually a salmon-ish brown color) was pulled for the sake of the lettering as seen once the next color is pulled.
Photo above shows the nine color stage. Again, some distortion due to the camera---the actual serigraphs are nice and straight/squared as are the straight lines of the shape that contains the lettering. Prior to pulling the peachy color over the brown, I hand-brushed the mucilage block-out over each letter (which I'd free-hand drawn onto the screen.)
If you have any questions about my process up to this point, please feel free to email me or, if you've accessed this posting via my Facebook page, then please leave comments/questions there. I will try to reply in a timely manner.
In the photo at the right, you are seeing the upper third of the image area -- at this stage the rest of the image area is still just the white paper. In this photo there are two colors: The purplish sky (pulled first) and the lighter bluish tone beneath where the thunderhead will be. Where these first two colors overlap it has the effect of creating a third color. I masked out the remainder of the image area, including the far ram (seen here as white.)

Photo at the above is at the five color stage. The thunderhead is starting to take on a nice decorative shape.
Photo above is at the six color stage. At this point I decided to stop working on the sky portion of the image and tackle the main body of the serigraph, and especially the lettering that would appear at the bottom of the image.
Photo above shows the 7th color now added at the bottom of the image. Again, I should note that colors are not entirely true in these photos (for example, the blank area is actually pure white of the paper still.)--and also there is some distortion due to having to photograph at too close a distance. The brown area (actually a salmon-ish brown color) was pulled for the sake of the lettering as seen once the next color is pulled.
Photo above shows the nine color stage. Again, some distortion due to the camera---the actual serigraphs are nice and straight/squared as are the straight lines of the shape that contains the lettering. Prior to pulling the peachy color over the brown, I hand-brushed the mucilage block-out over each letter (which I'd free-hand drawn onto the screen.)
If you have any questions about my process up to this point, please feel free to email me or, if you've accessed this posting via my Facebook page, then please leave comments/questions there. I will try to reply in a timely manner.
Subscribe to:
Comments (Atom)


